


2 月 . 16, 2025 03:16
Back to list
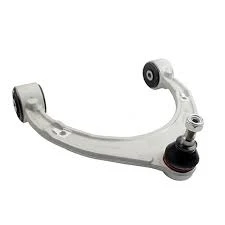
Auto or car CONTROL ARM
Removing Lower Control Arm Expert Tips and Step-by-Step Guide
4. Apply Penetrating Oil Generously apply penetrating oil to all nuts and bolts that you will be working on. This step reduces the risk of seizing and makes the removal process smoother. 5. Detach the Sway Bar Link Using the appropriate socket or wrench, unbolt the sway bar link connected to the control arm. If it’s stubborn, gently use a pry bar to ease it out. 6. Remove the Ball Joint Nut Locate the ball joint nut securing the control arm to the steering knuckle. After removing the nut, a ball joint separator tool can help disengage it from the knuckle safely. 7. Unbolt the Control Arm Identify the bolts attaching the control arm to the vehicle’s frame. Use a ratchet and appropriate socket to unbolt them. A breaker bar may be necessary if the bolts are particularly tight. 8. Remove the Control Arm Once all connections are free, carefully maneuver the control arm away from its position. Take note of how it was oriented for easier installation of the new part. Expert Tips - Take clear photos before disassembly. This provides a reference point for reassembly. - Inspect other suspension components while you're in there, as wear can occur elsewhere. - Replace old bushings and ball joints if they appear worn out. This ensures the longevity of the new control arm setup. - Always adhere to manufacturer torque specifications when reinstalling components to ensure they’re secured properly. While removing and replacing a control arm might seem daunting, conducting regular maintenance and being vigilant about unusual vehicle behavior is key. By following expert guidelines and utilizing correct techniques, vehicle owners can achieve both smooth and safe rides. Always remember, when in doubt about DIY repairs, consult with or hire a professional mechanic to avoid further damage. Trust in quality auto parts and expertise shouldn't be compromised when it comes to vehicle maintenance.
4. Apply Penetrating Oil Generously apply penetrating oil to all nuts and bolts that you will be working on. This step reduces the risk of seizing and makes the removal process smoother. 5. Detach the Sway Bar Link Using the appropriate socket or wrench, unbolt the sway bar link connected to the control arm. If it’s stubborn, gently use a pry bar to ease it out. 6. Remove the Ball Joint Nut Locate the ball joint nut securing the control arm to the steering knuckle. After removing the nut, a ball joint separator tool can help disengage it from the knuckle safely. 7. Unbolt the Control Arm Identify the bolts attaching the control arm to the vehicle’s frame. Use a ratchet and appropriate socket to unbolt them. A breaker bar may be necessary if the bolts are particularly tight. 8. Remove the Control Arm Once all connections are free, carefully maneuver the control arm away from its position. Take note of how it was oriented for easier installation of the new part. Expert Tips - Take clear photos before disassembly. This provides a reference point for reassembly. - Inspect other suspension components while you're in there, as wear can occur elsewhere. - Replace old bushings and ball joints if they appear worn out. This ensures the longevity of the new control arm setup. - Always adhere to manufacturer torque specifications when reinstalling components to ensure they’re secured properly. While removing and replacing a control arm might seem daunting, conducting regular maintenance and being vigilant about unusual vehicle behavior is key. By following expert guidelines and utilizing correct techniques, vehicle owners can achieve both smooth and safe rides. Always remember, when in doubt about DIY repairs, consult with or hire a professional mechanic to avoid further damage. Trust in quality auto parts and expertise shouldn't be compromised when it comes to vehicle maintenance.
Next:
Latest news
Upgrade Your Vehicle with Quality Control Arms
NewsNov.01,2024
Unlock Superior Performance with Our Control Arms for Sale
NewsNov.01,2024
Unlock Optimal Vehicle Performance with Diverse Control Arm Types
NewsNov.01,2024
Transform Your Ride with Lower Control Arm Replacement
NewsNov.01,2024
Revolutionize Your Ride with Control Arm Mounts
NewsNov.01,2024
Elevate Your Vehicle with Premium Control Arms
NewsNov.01,2024


